Building an EarthStar Odyssey

Joanne and I decided to build a EarthStar Odyssey in March 2003. It took us longer than expected to complete our plane (almost done in 2006). There were long periods when we did not work on the plane primarily due to personal and family issues.
Up front, we want to say that there is nothing wrong with our FlightStar. We still like it and fly it all the time.
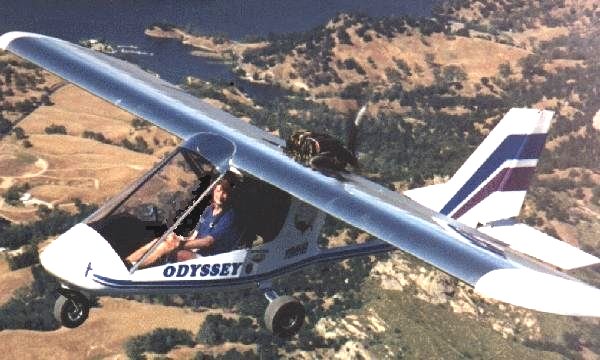
I've just always wanted an all aluminum airplane because I think they are so spiffy. Although technically, the Odyssey is not "all" aluminum (there's some PolyFiber covering on the Ailerons, Stabilator, Rudder and Flaps) it does have that beautiful, all aluminum, fully cantilevered wing. That's as close as I could get in the UltraLight type aircraft arena.
The designer of the Odyssey is Mark Beierle. Mark, like Tom Peghiny, has been involved with ultralights since the term was invented. For a description of Earthstar's other airplanes and a nice biography of Mark's aviation history, visit his website at EarthStar Aircraft.
The Odyssey is also much faster than the FlightStar. While I enjoy flying just for the sake of flying, Joanne wants to go places and see the world from the air. The Odyssey, with its 100 mph cruise speed (compared to the FlightStar's 70 mph) really opens up the envelope for longer distance flights.
The Odyssey takes about twice as long to build than a FlightStar and it is a more expensive kit to build. The one we're building is also more expensive because of our engine choice. We chose the HKS-700E engine for our new plane compared to the ubiqtuous Rotax 503 in the Flightstar.
The HKS-700E is a remarkable engine. It is distributed by Tom Peghiny, of FlightStar fame. It's a four-stroke engine, with a 1,000 hour TBO, that develops 62HP on auto gas, while consuming only two and one half gallons per hour. For more details on the HKS engine, check out the HKS Info Sheet on the FlightStar website.

Mark Beierle continues to patiently assist us when we have questions.

We'll be adding new photos to the website as we go along.
So log in frequently and check in on our progress.


Delivery Delivery from Santa Margarita, California
Week One Mounting the Ribs
Week Two Adding the Rear Spar
Week Three (a) Aileron and Hinge Attachments
Week Three (b) Aileron Torque Tube
Week Three (c) Aileron Driver Arms
Week Four Plus Skinning the Wings
Weeks 5 to 11 More Wing Skinning
Weeks 12 to 23 Glueing and Skin Preparation
Weeks 24 to 37 Final Wing Glueing and Riveting
Week 37 Constructing a hoist to get the wing out of the way
Week 41 Some of the techniques we use to mount the ailerons and flaps
Starting again It's been a long time
Flap Handle Assembling the Flap Handle and Notch
Boom Tube Assembling the Boom Tube
Rudder&Brake Cables Assembling the Rudder and Brake Cables
Horizontal Stabilator Assembling the Horizontal Stabilator
Trim Knob Assembling the Trim Knob
Cable Comb Assembling the Cable Comb in the Cabin
Main Gear Assembling the Main Gear
Fitting the Battery Test Fitting the Battery to Align the Bottom Skin
Nose Shell Assembling the Nose Shell
Rudder Hinge Assembling the Rudder Hinge
Windshield Cutting the Lexan - Windshield and Windows
Fitting the Windshield Fitting the Windshield
Assembling Door Assembling the Door
Fitting the Door Fitting the Door to the Fuselage
Working Conditions Setting Up Working Conditions
Instrument Cowling Fitting the Instrument Cowling
Instrument Panel Setup Designing and Cutting the Instrument Panel
Fitting Side Skins Test Fitting the Fuselage Fiberglass Side Skins
Nose Shell Prep Painting & Sanding the Nose Shell
Routing Brake Cables Routing Brake Cables Through the Rear Wall
Re-Designing the Trim Knob Re-Designing the Trim Knob
Rear Wall Completing the Rear Wall
Mounting Engine Pan & Engine Mounting the Engine Pan and Engine
Exhaust Installing the Exhaust System
Engine-Where Things Go (1) Under Engine Pan Mounting the Oil Sump Tank, Ignition Control Modules & Electric Fuel Pump
Engine-Where Things Go (2) Above Engine Pan Mounting the Ground wires, Ignition Coils, Regulator, Oil Thermostat & Oil Cooler. Where to mount Fuel Lines, Oil Vent, Throttle Cable, & Choke Cable
Engine-Things on Other Things (3) Pneumatic Fuel Pump; Oil Temperature Sensor and two plugs; Oil Pressure Sensor; EGT; CHT
Oil System Oil System
Fuel System Fuel System
Engine Pan Seals Sealing holes in the Engine Pan


Home Page ----- Next Page